
Take good care of your sewing machine, and it will return the kindness! A well-tended machine helps you sidestep stitching problems and performs reliably from one creative project to the next, so you truly can enjoy the time you spend sewing.
Here are 15 ways you can help your sewing machine become the high achiever you expect. In addition to tips on maintenance, you'll learn about good habits you can develop as you put your machine through its paces.
1. CHANGE THE NEEDLE
Often, experts recommend inserting a new needle frequently because this is a smart way to prevent or solve many stitching snafus. After all, the needle takes the brunt of the impact as it pierces the fabric, and it can become blunt or develop burrs as it continuously repeats the stitch-forming process. If the needle hits a tough spot, such as at seam intersections, it could bend or possibly break, especially if it has been in use for a long time.
How often should you change the needle? One machine manufacturer says to replace the needle after every four to six hours of sewing time, while another recommends every eight hours. However, these are somewhat arbitrary rules. You may need to change the needle more or less often. If you're getting ready to sew a large, hooped embroidery design that requires 20,000 high-speed stitches, it makes sense to insert a fresh needle before pressing the "start" button. Likewise, when you're beginning an extensive project such as making a tailored suit or a queen-sized quilt, it's logical to put in a new needle as you set up the machine.
Beyond rules, common sense, and logic, what's really important is to listen to your machine. Almost every machine will show signs of strain when it needs more power to penetrate the fabric and form a stitch because of a faulty needle. A normally quiet machine may become obviously noisy. Some machines make a hollow sound, while others make an unpleasant crunching noise. Listen for the signals that tell you it's time to replace the needle.
2. USE THE CORRECT NEEDLE
While keeping the needle fresh is probably the No.1 favor you can do for your sewing machine, choosing the correct size and type of needle is a related good deed. You're probably well-acquainted with the most common sewing machine needle, the size 80/12 universal point. This will work well 95 percent of the time when you are sewing on light- to medium-weight fabrics with all-purpose sewing thread, so you'll want to keep a good supply of these needles on hand. But, there are times you'll want to choose from among the many other needles available today. Match the needle size and type to the fabric you are sewing and the thread you are using. For example, a 90/14 size needle is a better choice than an 80/12 for sewing a denim jacket, but a special jeans needle could be even better. A finer size 70/10 is preferred when sewing a thin, silky blouse, and a very sharp Microtex needle in this size may be the best bet of all. If the stitches look crooked on a knit fabric, switching to a ballpoint needle can help the stitches form more evenly; the solution to skipped stitches on synthetic knits is often as simple as using a stretch needle. If you're using a specialty thread such as metallic thread or fine embroidery thread, you probably need a specialty needle designed for the thread to help the machine sew in top form.
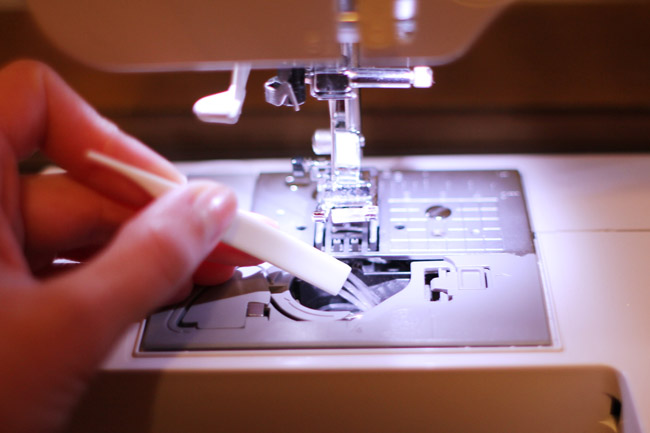
3. LOSE THE LINT!
As the needle pierces the fabric and the thread slides through the fabric layers, stray fibers are released. These little bits of fluff, otherwise known as lint, accumulate in hidden places in the machine: under the bobbin, in the teeth of the feed dogs, on the needle shank, and in many other nooks and crannies. Lint buildup can affect the overall performance of your machine, so it's a good idea to get in the habit of using the lint brush that came with your machine whenever you stop to change the bobbin. Clean any lint from the case before inserting a new bobbin. After changing several bobbins, remove the throat plate and carefully brush out the lint in the bobbin hook and feed dog areas.
Do not blow into the bobbin area to dislodge the lint. Your breath contains moisture, which can be harmful to the metal parts and delicate electronic components. If a brush won't completely remove the lint, use special miniature vacuum tools to lift it out. According to some sewing machine manufacturers, removing lint with a brush or small vacuum is the preferred method. They warn against using canned air as it can blow lint and debris deeper into the hidden parts of the machine, potentially causing damage.
Besides the lint produced by sewing, airborne debris such as dust and pet hairs can also create stitching challenges. It's a good idea to keep your machine covered when not in use. If the molded hard cover that comes with a portable machine doesn't accommodate a machine that is plugged into an outlet, you can use a clear plastic cover as an alternative. Another option is to make a decorator cover for your machine using a commercial pattern or one available on the Internet. Search for "sewing machine cover" on your browser and select your favorite free pattern to download.
4. FLOSS THE DISCS
The tension discs above the needle shaft on a sewing machine can harbor lint, bits of thread, and other debris, which can lead to stitching interference. On some sewing machine models, the housing on the machine head is hinged, and you can easily access the tension discs. On other models, this area is only accessible by a factory-trained technician. In either case, you can pass a clean, lint-free cloth or a length of buttonhole twist from top to bottom through the discs to remove any unwanted deposits. Ensure that the presser foot is raised so that the tension discs are relaxed as you clean them.
5. LUBRICATE, PLEASE
All sewing machines require lubrication, but this may not be a do-it-yourself job for your model. Consult your machine manual to determine the manufacturer's recommendations for oiling specific parts in your machine and how to do it.
In general, older mechanical models and some of the latest high-speed home embroidery machines require a drop of oil at numerous points, applied frequently. Newer computerized machines rarely call for this kind of maintenance at home, but every model is different. You may be directed to place a drop of oil in the bobbin area after you've cleaned out the lint, but more and more of the new models tell you not to apply any oil by yourself. This is because the lubricating points are located in a sealed area of the machine filled with sophisticated components that can only be serviced by a qualified technician.
Above all, if the manual says to oil it yourself, be sure to use only special sewing machine oil that is a very light, highly-refined product. Common household lubricants such as graphite spray, 3-in-1 oil, and vegetable oil will damage a sewing machine, possibly beyond repair.
6. THREAD MACHINE FROM THE NEEDLE
Don't pull the spool from the spindle. This common practice draws the thread through the tension discs and the interior of the machine in the wrong directions, depositing lint as it goes. Instead, when changing thread for a new sewing project, clip the thread at the spool and draw the thread tail out through the eye of the needle. Then remove the spool from the spindle.
7. USE QUALITY THREAD
Everyone likes to save money on sewing supplies, but discount thread is no bargain. It may have thick and thin areas that result in poor-quality stitch formation or weak spots that cause thread breakage from the friction inherent in the stitching motion. It may have imperfections such as knots that can bend needles and jam the machine. Furthermore, it's likely to have short fibers that shed lint along the entire thread path, from the bobbin winder to the tension discs to the feed dogs. Cheap thread is simply not worth the trouble.
In addition, old thread is no bargain either. Even good-quality thread does not last forever. Test the vitality of stored thread by grabbing a length and pulling it until it breaks. If it offers little resistance, discard it.
It's also worth mentioning that some threads simply should not be used in a sewing machine. Button/carpet thread, for example, is too stiff for use in a sewing machine. Waxed hand-quilting thread is another good example, but there are quilting threads (waxed or not) made for use in a sewing machine, so check the label.
8. ADJUST THE TENSION ON THE NEEDLE THREAD
Most machine models provide handy dials or other controls at your fingertips for this purpose. Adjusting the bobbin case tension is a bit trickier because you must turn the screw on the bobbin case; just a partial turn can make a huge difference in the thread tension.
Since there are no numbers or etched lines, you can't return the bobbin tension to the original setting easily. Furthermore, the small screw is delicate and easily stripped.
However, you cannot use the bobbin tension "as is" for some machine techniques, such as those that use a decorative thread in the bobbin. One solution is to purchase a second bobbin case that you can adjust as needed and preserve the original case untouched. Mark the "adjustable" bobbin case with fingernail polish to easily identify it. In addition, some manufacturers offer, as a separate purchase, a special bobbin case with a larger escapement for decorative threads.
9. THREAD WITH PRESSER FOOT UP
When the presser foot is lifted, the tension discs relax. In this position, the thread can seat properly between the discs, ensuring beautifully formed stitches. If you encounter the problem of thread loops forming underneath as you stitch, it's because there's no tension on the needle thread. You probably threaded the needle with the presser foot down with the tension discs closed. That prevents the thread from sliding into its proper channel. Just rethread the machine correctly, with the foot up, and resume stitching.
10. TAKE IT SLOW!
Stitch formation is a wondrous thing. The feed dogs move the fabric while the needle thread delivers one thread, and the bobbin delivers another to connect perfectly between the fabric layers. All those finely made parts are timed to work together to create a perfect lockstitch.
This process takes longer on fabrics such as thick wool coating, fake fur, wide-wale corduroy, upholstery fabric, and rugged canvas. Therefore, it is recommended to slow down for better results and to minimize skipped stitches. Some machine models have a control feature that allows you to limit the speed and help the machine perform optimally under these circumstances.
11. STORE IT WHERE YOU LIVE
Protect your sewing machine investment by finding a storage space in a closet or under a table in a room you use throughout the year. Sewing machines can suffer when kept in unheated and non-air-conditioned spaces such as attics and garages. Extreme temperature variations can cause the machine's lubrication to evaporate or turn sluggish, while humidity and condensation can lead to corrosion of metal parts and delicate electronics. To avoid potential damage, it's best to store your sewing machine in a controlled environment.
12. KEEP CHEMICALS AWAY
When using spray starch, aerosol adhesives, liquid stabilizers, or any other sewing chemicals, it's important to apply them in an area separate from your sewing machine. Airborne residue, such as overspray, can settle into and onto the machine, potentially causing damage to its working parts. To protect your sewing machine, create a designated space for applying these chemicals away from the machine itself.
13. TRANSPORT THE MACHINE ON ITS BACK
When transporting a portable sewing machine, it may seem natural to sit it upright in the trunk or on the car seat. However, it is actually better to lay the machine on its back during transportation. This position provides more stability and reduces the risk of the machine tipping over or falling in case of sudden stops. While using a seat belt to secure the machine is optional, it is a good idea to ensure its safety during transportation.
14. KEEP MAGNETS AWAY!
It's important to keep magnets away from your machine to avoid potential interference with its electronic components and mechanisms. Magnets can disrupt the machine's internal sensors and affect its performance, leading to stitching issues or even permanent damage.
Avoid placing magnets near your sewing machine, including magnetic pin holders, magnetic seam guides, or any other magnetic accessories. Keep in mind that some sewing machine features, such as computerized controls or automatic thread cutters, may be particularly sensitive to magnetic fields.
15. DON'T SEW OVER PINS!
Sewing over pins might seem like a time-saving technique, but it can be detrimental to both your sewing machine and your project. Sewing over pins can cause the needle to bend, break, or even damage other components of the machine. Additionally, it can lead to inaccurate stitching, uneven seams, and even potential injury if a pin pops out unexpectedly.
To avoid these issues, always remove the pins before the needle reaches them while sewing. Take a moment to pause and remove each pin as you approach it, ensuring a smooth and uninterrupted stitching process. It's a good practice to place pins perpendicular to the seam, allowing easy removal without disturbing the fabric or the sewing machine.
By taking the extra time to remove pins before sewing over them, you can protect your machine, prevent potential accidents, and achieve better stitching results.
16. SERVICE ONCE A YEAR!
As a bonus favor that you don’t have to do yourself, you should get your machine serviced by a trained technician annually! Regular servicing and maintenance are crucial to keeping your sewing machine in top condition. While you can perform routine care and cleaning yourself, it's recommended to have your machine professionally serviced at least once a year. This annual servicing helps ensure that your machine continues to operate smoothly and extends its lifespan.
During a professional service, a trained technician will thoroughly clean and lubricate the internal components, check for any signs of wear or damage, adjust tensions and alignments, and perform any necessary repairs. They can also identify and address any underlying issues that may affect the machine's performance.
Having your sewing machine serviced annually not only helps maintain its optimal functionality but also allows for early detection of potential problems before they escalate. It ensures that all the intricate parts of your machine work harmoniously, providing you with reliable and high-quality stitching results.
Taylor Abrams on
Hi, I just remembered that it’s about time for my mom’s birthday. I wanted to gift her something special, and my first thought was a sewing machine for quilts. I’ll go hunt for one immediately as she’s been dreaming of getting one for a very long time! However, I must tell her that you should always use spray starch, aerosol adhesives, liquid stabilizers, and other sewing chemicals in a location far from your sewing machine. http://www.singerfactorydistributor.com/products.htm